Login to blogger->settings->comments
then set to popup window
Next. Layout->edit html
and find this line of code
<p class='comment-footer'>
<a expr:href='data:post.addCommentUrl' expr:onclick='data:post.addCommentOnclick'>
<data:postCommentMsg/></a>
</p>
and change it to this
<p class='comment-footer'>
<b:if cond='data:post.embedCommentForm'>
<b:include data='post' name='comment-form'/>
<b:else/><a expr:href='data:post.addCommentUrl' expr:onclick='data:post.addCommentOnclick'>
<data:postCommentMsg/></a></b:if>
</p>
then SAVE
after that go to settings->comments and choose embed below post
THATS ALL
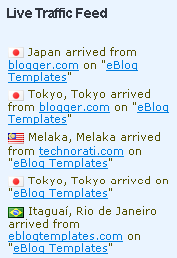
It’s a rounded corners, web 2.0, three column, orange and shaded blue beauty with some great features and widgets you’d normally only find with a WordPress theme. Here’s a list of what’s included: You can see from this screenshot that the actual editor is nicely setup so you don’t need to scroll or try and figure out how to click on the “edit” widget links. Most templates that you download make it tough to edit — not this one! Now before you can get fully up and running with this new Blogger template, you’ll need to properly set things up. Please follow the steps below and read items carefully. The same questions are usually asked over and over by people posting comments, yet the answers are usually right in front of them. This is especially true for why the post date might not be working on your blog.Let’s start from the top of the template and work our way down each item. Don’t be too surprised when the template doesn’t look like the screenshot when you first load it up. You’ve got some configuring to do first! This is actually pretty easy since the top tabs are a link list. You don’t need to alter the template code. Just go into your Blogger page layout and click on the “edit” of the “top tabs” widget. Start adding new links and then save. A “home” link will automatically appear once you setup this widget so you won’t need to add one. Save and refresh your blog to see the pretty new tabs you just created. Here’s what it should look like (different names of course) This section is actually setup to dynamically work except for the Feedburner link. You’ll first need to have a FeedBurner account. If you don’t already have one, please read the “How to Setup FeedBurner on Blogger” article and then come back. Once you’ve got your FeedBurner account, you’ll need to edit this template code and replace a few parts. Search your template code for the following text: After you’ve changed this link save your template and check to see if it works. If you’re having trouble finding your feed name or id, please read our article above or see FeedBurner’s help section to locate it. This is a very important step and one that most people think is broken when they install the template. It’s not folks. You just need to go into your Blogger settings and make a small change before it will work. After you install the Blogging Pro template, go to your Blogger’s “Settings” => “Formatting” and look for “Timestamp Format”. Make sure you change it to this format: “Tuesday, January 25,2008? as shown below. This needs to be set in this format otherwise the date won’t show up properly on each of your posts! Actually the date will most likely be blank and you’ll think the template is broken. Remember to change the TIMESTAMP FORMAT (fourth item down on the page) and NOT the Date Header Format option. This is actually a really cool widget put into the sidebar by default. If you have never heard of Amazon’s “Deal of the Day” then you’ve been missing out! Basically each day Amazon has one special item they drastically reduce in price. Before you’d have to visit their site to see the deal but now it gets delivered directly to your Blogger site! If you want to replace or remove this widget you’ll need to edit the code and look for the following text “amazon-widget”. The line of code below that is the actual Amazon widget so just remove or replace it. I really love this part about the template. In the past, your footer was an overlooked piece of real estate on your blog. With this template, it makes good use of your footer like many of the other pro bloggers out there today. This one is easy to setup since we’ve already written an entire article dedicated to this. Please see “How to Setup Recent Comments and Posts Widgets” to configure these two widgets. These two widgets will both appear in the footer once you configure them properly. It’s a very good use of space and provides search engine spiders an entry point into your blog content. This is the other footer element which comes already setup with our recommended money maker links and programs. This idea came from the ProBlogger.net web site and we included it in our template. You are welcome to keep the links intact or feel free to replace them with your own. You will need to edit the template code to swap them out and also have affiliate accounts setup with each vendor. It’s easy if you don’t have any accounts. Just click on each footer link to setup a new account. Search your template code for “Recommended Money Makers” and you’ll see the links below that. This is a really cool feature within this template and the best part is you don’t need to do anything to setup it up! There are some further options if you click on “options >>” on your actual blog page under the widget but that’s it. This is a sample of what it will look like once you start generating some traffic (or more traffic) to your blog. You should now have the template all setup and ready to go. I hope you enjoy this beauty and please make sure to keep the footer links intact since numerous hours of my time and the original designer were put into making it. That’s all we ask for giving away this template! Enjoy!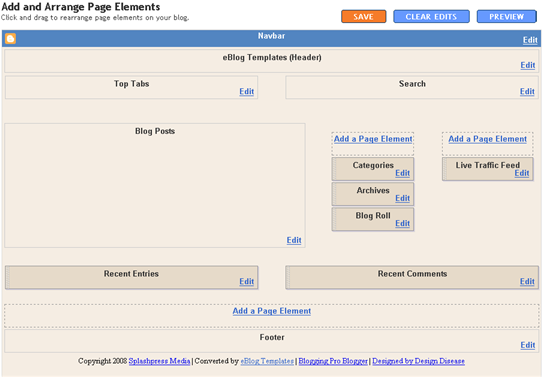
![]()
Top Tabs Setup
![]()
Configure The Three Header RSS Links
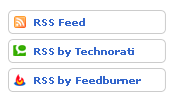
YOUR-FEED-NAME-HERE . Replace the text with your FeedBurner name (i.e. eBlogTemplates is ours)Individual Post Date Setup

Amazon Deal of the Day Widget

Footer Recent Posts and Comments Widgets

Recommended Money Makers Section
Live Traffic Feed Sidebar Widget
I'm pleased to announce that the long awaited Blogging Pro template conversion originally designed by Design Disease has been released! This is the test site to show you how cool this new Blogger template is.
There are several great features and lots of built-in ad spots so you can start monetizing your blog immediately.
If you don't already have this lovely new xml Blogger/Blogspot free template, you can download Blogging Pro for Blogger right now.
Subscribe to:
Posts (Atom)